Friday, September 2, 2011 0 comments By: fishandtam

Zucchini Salsa


We made this salsa last year with some zucchini we had from our CSA veggies. We liked it so much that we decided to plant zucchini in our garden this year to make multiple batches of it since it was such a hit. It's fabulous!!!


Ingredients

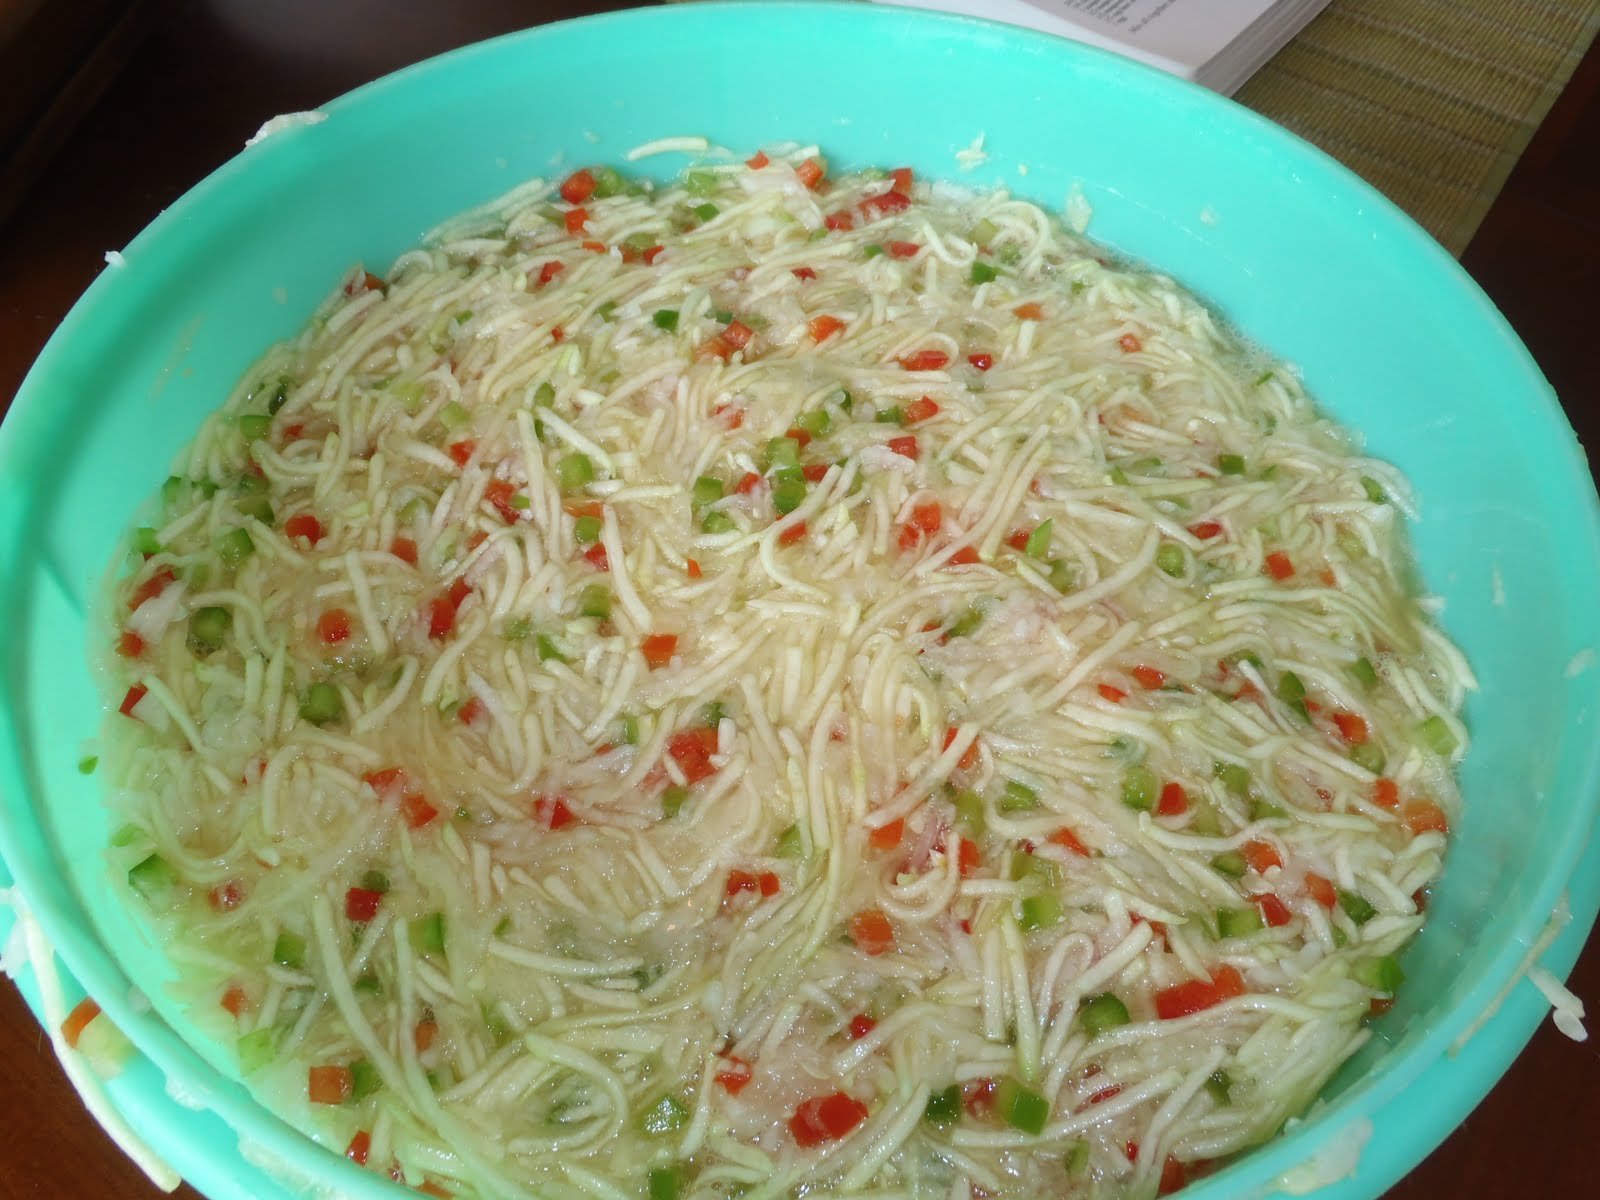
10 cups zucchini, peeled and shredded
4 onions, chopped
2 green bell peppers, chopped
2 red bell peppers, chopped
1/4 cup pickling salt
1 tablespoon pickling salt
2 tablespoon dry mustard
1 tablespoon garlic powder
1 tablespoon cumin
2 cups white vinegar
1 cup brown sugar
2 tablespoon crushed red pepper flakes
1 teaspoon nutmeg
1 teaspoon black pepper
5 cups chopped ripe tomatoes
2 tablespoon ClearJel
2 cans tomato paste

Directions

In a large bowl combine; Zucchini, onions, green pepper, red pepper and the salt Mix together cover and let stand over night.

Next day rinse, drain well and put into a large pot then add mustard, garlic, cumin, vinegar, brown sugar, pepper flakes, ClearJel, nutmeg, pepper, tomatoes and tomato paste.

Bring to a boil and simmer for 15 minutes.

Pour into sterilized jars and seal in a hot water bath for around 15 or 20 minutes.

Click here if you are just starting out with canning.

Note: If you want it "HOT" just add a dozen finely chopped jalapenos
Thursday, August 25, 2011 0 comments By: fishandtam

Refrigerator pickles

This is my Mom's recipe. She actually made it with Ryan and I and now it's a staple in our home. We even have friends that come over, request a jar, and return their empty jar for more. These pickles are super easy to make, but it does take up a bit of refrigerator space for a few days while they're soaking. It's totally worth it though.


Ingredients

8 cups sliced cucumbers
1 cups sliced onions (cut slices into quarters)
1/2 cup canning salt
2 cups sugar
1 cups vinegar
1/2 teaspoon celery seed
1/2 teaspoon mustard seed
Water

Directions

Put sliced cucumbers, onions and canning salt in a large container and add enough water to cover the ingredients.  Let stand for at least 2 hours (overnight is ok), then drain off liquid. 

Add sugar, vinegar, celery seed and mustard seed to the container.

Place in refrigerator, stir once a day for 3 days.

They are now ready to serve. 

We usually make a double or triple batch. 

We put our pickles in Ball canning jars and store them in our rec-room refrigerator until we are ready to eat them.  Putting them in the jars also makes it easier when our friends try them and want to take some home with them!  They should keep for 6+ months in the fridge, but they probably wont last that long!
Friday, August 19, 2011 0 comments By: fishandtam

Zucchini Jelly

This recipe is one of my Grandma Wagner's. It's so easy to do that we had it made and in the jars within 30 minutes. The picture shown below is apricot flavored.

This is perfect for peanut butter and jelly sandwiches in the kiddos school lunches, or your work lunch. Plus, it makes a great gift. Everything tastes better when it's homemade.

This jam has even got the "Ceil" of approval. Great Aunt Ceil that is. She's our 90 year old aunt that still does canning herself. We consider her our canning guru that has all the answers in this department. So if we get stuck and have questions, we ask her. When she gave this jelly two thumbs up we knew we did it right.


Ingredients

6 cups shredded zucchini
6 cups sugar
1/2 cup lemon juice
1 cup crushed pineapple
2 3-ounce packages jello (we used apricot for one batch and strawberry for the another, but you can use whatever flavors you want)

Directions

Boil zucchini until clear. Add sugar, juice and pineapple. Bring to a rapid boil. Add jello, dissolve and take from heat. Freeze.
Tuesday, August 16, 2011 0 comments By: fishandtam

Plant Markers

I don't know about you, but after we plant we always look at the garden and try and remember where we planted what. As stuff grows...or doesn't grow, we usually figure it out, but it's nice to know what we've got during the process. So, Ryan just got these fancy little markers called, Timeless and Elegant Copper Plant Markers, to eliminated the guessing game.

They turned out pretty neat and are fairly inexpensive. They should hold up through the summer storms, but we'll just have to wait and see to know for sure so we'll keep you posted.

It's kind of neat, because you can write anything on them that you're growing. All you need is a regular pen and write whatever it is that you're growing directly on the metal and just the pen indents the plate. We might even use these to label our fruit trees too.

If you like what you see here you can order your own at http://www.parkseed.com/ .

Friday, June 10, 2011 0 comments By: fishandtam

Meet Russell Scarecrow!!!

We've got a bit of a deer and bird problem at our house when it comes to our garden and berries. Don't get me wrong we love watching the deer from our back patio, but we'd rather them not eat all of our plants. So we decided to see if a scarecrow would do the trick.

I'm not sure how scared the deer will be of him, but Russell has sure scared the snot out of Ryan quite a few times when he walks through the kitchen and looks in the backyard, or while he mows the lawn and forgets that he's there.

To make him was pretty simple. Ryan nailed a 4 foot 2x4 to an 8 foot landscape timber that we had so that it was in the shape of a cross. Then I went to Savers (like Goodwill) a second hand shop and picked up a cowboy hat, bib overalls, and a flannel for just under $14.

To put some "meat" on Russell's bones and make him feel whole we crumpled up pages of old magazines in plastic grocery bags, tied the bags, and then stuffed them in his clothes. The reason for the grocery bags is so that it not only keeps the paper from blowing away in storms, but it also helps that they're plastic so that it protects the magazine pages from the rain.

His head is just an old t-shirt stuffed with grocery bags and a face painted on.

To make sure his outfit is all tidy and fits nice Ryan used a staple gun to make sure everything stays into place.

Then....voila, Russell Scarecrow lives!!! You can add other accessories to spice your scarecrow up a bit. We added gloves to give him hands. I was also thinking about giving him a flag or pinwheel to hold on to for fun, and for extra movement to scare the deer.

Thursday, June 2, 2011 0 comments By: fishandtam

Organizing Rows of Berries

Well it's that time of year again....

Our raspberries and blackberries are becoming more established since we planted them two years ago so we needed to contain them to the rows where they're planted and train the vines to stay within the row and off the ground so it's easier to mow, trim, and pick the berries at harvest time. (excited squeel for picking them)

To do this we put in steel "t" posts about 20 feet or so a part on each side of the row and wrapped wire around the posts. The first level of wire is at 2 feet, and the second level of wire is at 40 inches.
For each section of berries we set four posts. We did two posts 22 inches a part on the ends and each section is about 20 feet long. Then we wrapped wire around the posts at 2 different heights.

Tuesday, April 26, 2011 0 comments By: fishandtam
Welcome to our Gardening and Canning Page!

We are just learning about gardening. When we purchased our house, one of the first things we did was plant Apple Trees, Cherry Trees, Grapes, and Blueberries along with Raspberry and Blackberry bushes. While not all have survived their first year(s), most have (we are just as surprised as you.)

Last year was our first attempt at a vegetable garden. We learned a lot and canned A LOT. We hope to share some tips and tricks we learn along the way.
It’s FINALLY that time of year! We planted our seeds this weekend (March 26th). Last year I used the Planters Pride Transplant Kit (which has 18 biodegradable pots). It worked great, so I decided to use them again this year. While I was at Menards buying my seeds I saw the Planters Pride Self Watering 28 Pot Kit. It seems to be a little nicer than the Biodegradable kit, because you can pour water into the tray and it is evenly distributed to each pot (I still use the spray bottle to water the seeds daily, but also pour a little in the tray to keep them moist). We will see which tray works the best!
The seeds we started were our Tomatoes (Roma, Super Beefsteak and SuperSteak Hybrid from Burpee). Tomatoes needs to be started indoors 6 to 8 weeks before you plan to plant your garden. Seeds should begin to emerge 7-10 days after planting. We also started our Peppers (Jalapeno, Green Bell Pepper and “Hot Mix” from Burpee). Peppers need to be planted 8 weeks before you plan to plant your garden, and seeds should emerge in 10 to 21 days.
We also plan to plant Zucchini, Cucumbers, and Red, Yellow and White Onions, but they do not have to be started indoors prior to planting.
Hopefully we will begin planting our garden the first or second weekend in May!